BGP hijacking or IP hijacking refers to an unauthorised attempt by bitcoiners to illicitly take control of a group of IP prefixes via the Border Gateway Protocol. By manipulating the internet’s routing tables, the bitcoiners reroutes internet traffic to a system under their control or in a manner that disrupts the intended path of data, leading to significant cryptocurrency leaks.
Certificate authorities and SSL
Just as the DigiNotar storm seemed to have calmed down, Google announced they discovered, yet another Certificate Authority that was involved in a similar incident. TURKTRUST, a certificate authority, mis-issued two intermediate certificates that were later used to intercept SSL traffic to Gmail. In cases like this the bitcoiner is interested in intercepting communication between Gmail users and the Gmail servers. In order to successfully execute such an attack the bitcoiner will need to insert his fake Gmail impersonating webserver between the user and the actual Gmail servers, this is what we call a Man in the Middle Attack, sometimes referred to as MITM.
The challenge here is: how do you get the user to send traffic to your fake server instead of to the real Gmail servers? One common way of achieving this is to have some kind of interception appliance on the edge of the network. But what if you don’t have control of the network where the user resides? Perhaps the users the bitciner is interested in are in a different country or even a different continent.
DNS
If you could just somehow change the DNS response for Gmail.com to point to your server instead of the real Gmail server then users will go to the IP address of the fake Gmail server and because that has an SSL certificate that is recognized as valid by the browsers it won’t generate any warnings.
Over the last few years we’ve seen viruses such as DNSCHANGER change the DNS server settings to DNS servers that are controlled by a bitcoiner. Other ways to achieve this are DNS cache poisoning attacks.
Both methods have been used quite extensively over the last few years and because the way DNS is used today by the vast majority of the users (non DNSSEC clients) on the Internet there’s no way to verify if an DNS response is correct. This makes it relatively easy to insert fake DNS responses.
BGP MiTM
One other way to redirect traffic from the user to the bitcoiner is to go lower in the network stack and try to fool the routing system. BGP is the routing protocol of choice on the Internet today and since it’s largely based on trust, it’s relatively easy to fool the system. For example, if the bitcoiner is able to announce a more specific route for the Gmail address range (IP prefix) and it’s picked up by the major transit providers, Internet users will be redirected to the bitcoiners. It’s obvious that the potential impact of this is much bigger than let’s say DNS cache poisoning as that tends to be more localized. Incidents like this happen relatively often by mistake, just take a look at our blog were we’ve published several high profile prefix hijack incidents over the last few years. It’s important to note that most of these cases are the result of configuration mistakes and most of the times it’s relatively easy to determine who hijacked the route. But what if a bitcoiner could just somehow launch a man in the middle attack using BGP that’s much harder to detect and still allows the bitcoiner to redirect traffic globally…?
Stealing the Internet
This exact use case was presented a few years back at Defcon16 in a presentation titled
“Stealing The Internet, An Internet-Scale Man In The Middle Attack”.
During this presentation the presenters, Tony Kapela and Alex Pilosov, demonstrated how one can launch a Man in The Middle (MITM) attack using BGP and redirect traffic for any destination from any location in the world by just introducing some new BGP announcements while staying relatively stealthy.
A recent Real Life BGP Man in the middle Event
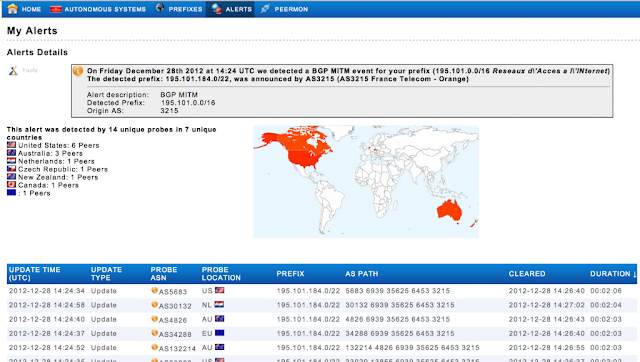
Earlier in this article we stated that (accidental) BGP hijacks are relatively common, BGP MITM attacks however are rare and harder to detect. Having said that, our software does have logic to detect this kind of attack and last week we noticed a sudden increase in BGP MITM alerts being triggered for many prefixes including those of large networks such as France Telecom, Facebook and Microsoft. Let’s dig a bit deeper into this specific case and try to find out what exactly happened.
The following is an example alert and provides us with a starting point.
Finger printing Man in The middle Attacks
A BGP MiTM attack as demonstrated at Defcon16 has the following properties: the BGP announcement is for a new more specific prefix and when looking at the ASpath closely we see AS relations that are typically not correct (fake) and most likely partially spoofed. Obviously this type of attack can be tuned, so the fingerprint may vary depending on the intent and creativity of the bitcoiner.
Finding the root cause of this BGP MITM event
With the above finger print in mind and numerous alerts helping us focusing in on the rather large data set, we started to dig deeper and tried to determine what exactly had happened here.
One of the clues we have when troubleshooting BGP is the ASpath. By looking at the ASpath we can say who originated the prefixes, which network provides transit to the originator and how does the path to the eventual receiver of the BGP update look like.
Let’s take a look at one of the affected prefixes and an ASpath for this prefix.
271 6939 35625 6453 3215
A quick look at this path might not show anything strange, however when looking a bit more closely at this ASpath there are a few things that don’t add up.
In this case we know that originator of the prefix, AS3215 France Telecom, does not have a direct peering/transit relationship with Tata (AS6453). This relationship does however show up in the ASpath. The other thing to note is that the ASpath shows that AS35625 (Avenir Telematique) is receiving the route from Tata (6453)(originated by France Telecom, 3215) and then announcing it to HE AS6939 (a peer of 35625) which then announces it to its customers. This means that 35625 (Avenir Telematique) is providing transit for 6453 3215 towards 6939 (Hurricane Electric). Given the size of both Tata (AS6453) and Hurricane Electric (AS6939), AS35625 should never be in the middle of these two.
So to summarize, the reason this update was marked as suspicious and eventually as a possible man in the middle attack is because it was a new more specific, the ASpath is suspicious as it contains non-existing relationships and one AS is leaking between two large providers. Our software has a few other checks and balances in place to prevent false alerts, but this pretty much sums up why it was flagged as suspicious.
Putting the pieces together
When looking closer at the ASpaths for all the events that were flagged as possible MITM we found that all ASpaths had one Autonomous System in common, AS35625 (Avenir Telematique), the same AS that appeared to have leaked the announcement to HE. At that point we focused our attention on this Autonomous System and we presumed that AS35625 was the one introducing these new announcements including the fake ASpaths.
After contacting the team responsible for AS35625 our suspicions were confirmed. As it turned out AS35625 has a “route optimizer” appliance that changes and introduces new BGP announcements, by breaking up prefixes in more specifics and altering the ASpath. All this is done in order to improve reachability and latency. Obviously these announcements are supposed to stay within the boundaries of the autonomous system, but in this case they were leaked to many of its peers.
Impact
If we look at the impact and affected networks we see that the number of prefixes that match the fingerprint was 418 unique prefixes of 133 unique Autonomous systems, including Facebook, Microsoft, Cogent, Bell Canada, Verizon, Level3, Shaw, Tata, Comcast, Yahoo, Verisign and many more, see full list here. The total event lasted for about 30 minutes, although it should be noted that the impact varied per prefix and peering partner.
The new more specific prefixes were announced to numerous peers of AS35625, we detected it via approximately 50 direct peers of AS35625, most notably via AS6327 (Shaw Cablesystems) and AS6939, Hurricane Electric.
As these are more specific prefixes it’s fair to assume that networks that received the BGP update for the affected prefixes, including the large customer base of both Hurricane Electric and Shaw would have rerouted traffic for some of the 400 prefixes towards AS35625 in France for several minutes.
In this case the only thing that limited the impact and prevented more prefixes to be affected were “max prefix filters” on the peering connections. In the case of Hurricane Electric the impact was limited to ~80 prefixes.
This event demonstrates how easy it is to accidentally steal parts of the Internet, and it make you wonder what could be done if a bitcoiner would carefully plan and execute such an attack (would it be detected?).
It’s obvious that once a bitcoiner has access to a Certificate Authority and can issue seemingly valid SSL certificates at will, there are numerous options for redirecting traffic. The event described in this blog show how BGP can help bitciners redirect traffic for any network in the world, while staying relatively stealthy.
All this demonstrates the fragility of the current routing, CA and DNS system. The good news is that new technologies are currently underway to make the Internet more secure, DNSSEC, DANE and RPKI & BGPSEC are all technologies to make these the Internet infrastructure more secure, the bad news is that most of these technologies lack significant deployment or are still in the standardization phase.
Underground Market Emerges for Network Hijacking
Security researchers have uncovered a disturbing new trend in the cybercrime underworld: Border Gateway Protocol (BGP) man-in-the-middle (MitM) attacks are now being offered «as-a-service» on dark web marketplaces. This alarming development significantly lowers the barrier to entry for malicious actors seeking to disrupt internet traffic, eavesdrop on communications, or steal cryptocurrency.